Hello coach\team manager,
Follow these 3 easy steps to start using TeamTracky:
Step 1. Add your team.
You can add your team by using your browser or the TeamTracky mobile app.
Using your browser
- Visit www.teamtracky.com and click the [SIGN UP] button in the right top corner.
- Fill up your personal information in Step 1:
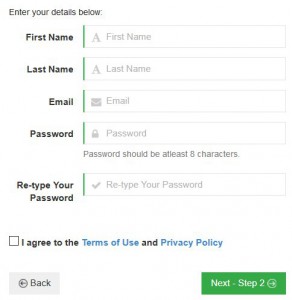
Click [Next – Step 2].
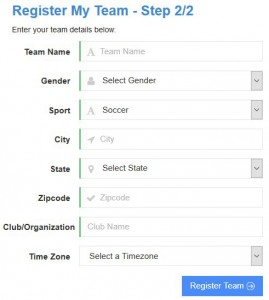
- Fill in your your team’s information in Step 2 and click the [Register Team] button.
Adding your team will automatically make you the team owner and gives you manager access to all features. You can add other members, manage events, send notifications, and carry out other team management functions to which invited members don’t have access. Team owners can give manager access to any other member and can even transfer the team to someone else on the team.
Using the mobile app
- Download the TeamTracky app:


- Tap the [Create Account] button (not the [Sign In] button; you’ll use that to log in later).

- Fill up your personal and team’s information in the registration form and tap the [Register Team] button.
….
Your team is added and you should receive a confirmation email.
Click the link in that email to verify your email address and log in for the first time.
Step 2. Invite your members.
It’s getting a bit lonely now, so it is time to invite your team’s members (players, assistant coaches, trainers, etc.).
Add Members One-by-one
To add a member select [Team Members] from the main menu and click [Add Member]. Complete the member’s contact info and the rest of the fields in the form.
Pay special attention to the following required fields:
- Member type (for more info, click here).
- Track availability.
When this field is set to “No,” members won’t appear in the attendance page and they won’t be able to set their availability for team events (the default option is “Yes”). - Member has manager access.
By default, new members have no manager access. Only check this if you want to give someone manager access.
Finally, click the [Save] button to add the member to the team.
The member will receive the invitation by email with a unique link to log into TeamTracky and join the team.
Until the new member accepts your invitation, s/he will have a status of “Not Registered.” Once s/he logs in for the first time, her/his status will change to “Active” (for more information on member statuses, click here).
Import Members
1. Add Members from a List of Names and Emails
If you have your team roster in a spreadsheet, copy and paste the member list in this format:
- First name
- Last name
- Email address
Enter one member per line, separate the fields by a comma, and try to avoid spaces.
Example:
John,Doe,john@email.com
Steve,Tses,steve@server.com
2. Import from a TeamSnap Export File
If you are switching from TeamSnap (good call, by the way) follow these steps:
- Log in to TeamSnap.
- Click the [Roster] button, then the [Export] button at the top right.
- In the “Export Roster” page, click the [Export CSV File] button and save the file to your computer.
- Don’t forget to say “Hi” for the last time… 🙂
- Then, log in to TeamTracky, click “Team Members,” then click “Import Members” on the menu.
- Click the [Browse] button in the “Import from a TeamSnap Export” section and upload the file you just exported.
- Click [Import] and you’re done. Your entire roster will be imported into TeamTracky.
For more ways to import members, click here.
Also, read this on adding parents\guardians or other users such as member spouses, trainers, etc.
Step 3. Schedule
The last step is to add or import your team’s schedule (games, practices, meetings, or other events).
For information on how to create events, click here.
Import League Schedule
We promised you to automate the process so that you can spend more time on the field.
To import your team’s league schedule, follow these steps:
- Visit go.teamtracky.com and log in as a manager.
- Select “Schedule” and then “Import League Schedule” from the menu.
- Select the league your team plays on and click the [Find My Games] button.
Make sure the team name and gender you assigned when you added your team matches what is entered in the league. If the name can’t be matched exactly, you’ll be prompted to find your team by typing part of its name or your club’s name. - Once you see all the games assigned to your team, select the ones you want to import and click the [Add Games to My Team’s Schedule] button.
That’s it.
You just saved a few hours. Go enjoy the rest of your day!